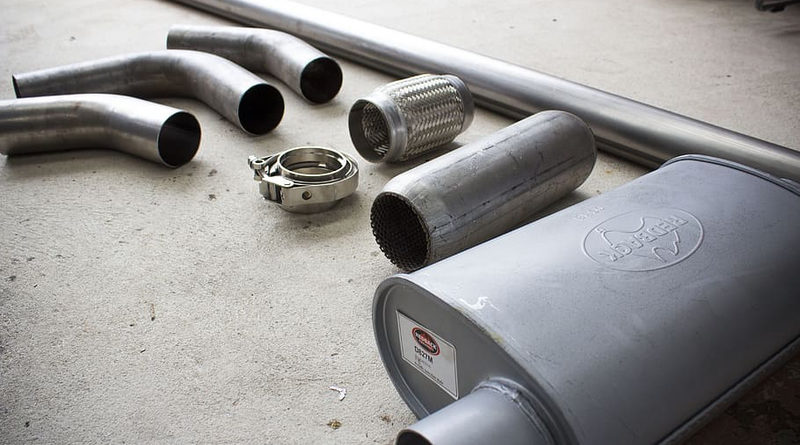
2004 Dodge Ram 1500 5.7 Hemi Exhaust System
A dodge ram exhaust system is a subsystem of an internal-combustion engine that expel waste gases through an interconnected network of metal piping in the course of its operation. The exhaust system channels exhaust fumes away from cylinder head and go through a structure of metal tubes that consist of an exhaust manifold, catalytic converter, extension pipes, resonator, muffler, heat shields and exhaust tailpipe. The metal tubing used in an exhaust system are usually made of mild steel, carbon steel, cast iron or stainless steel.
Exhaust System Description
The federal gasoline guidelines require every dodge ram pick-up truck have an exhaust system capable of expelling toxic combustion fumes. Federal regulation require by law that exhaust systems consist of an exhaust manifold, exhaust pipes, catalytic converter(s), exhaust heat shields, a device to reduce engine noise, and a tailpipe on the rear section of the truck’s exhaust system.
California emissions make it mandatory that dodge ram vehicles contain all of the above exhaust system components as well as catalytic converters attached to the exhaust pipe. The exhaust system must be arranged appropriately to prevent exhaust leakage and contact to the supporting fame under the body of the truck. Strict clearance tolerance between any exhaust system component and the body or undercarriage be a minimum of 25.4 mm (1.0 in.). If an exhaust system makes contact with any frame structure it will increase the volume to an objectionable noise level.
Exhaust System Illustration
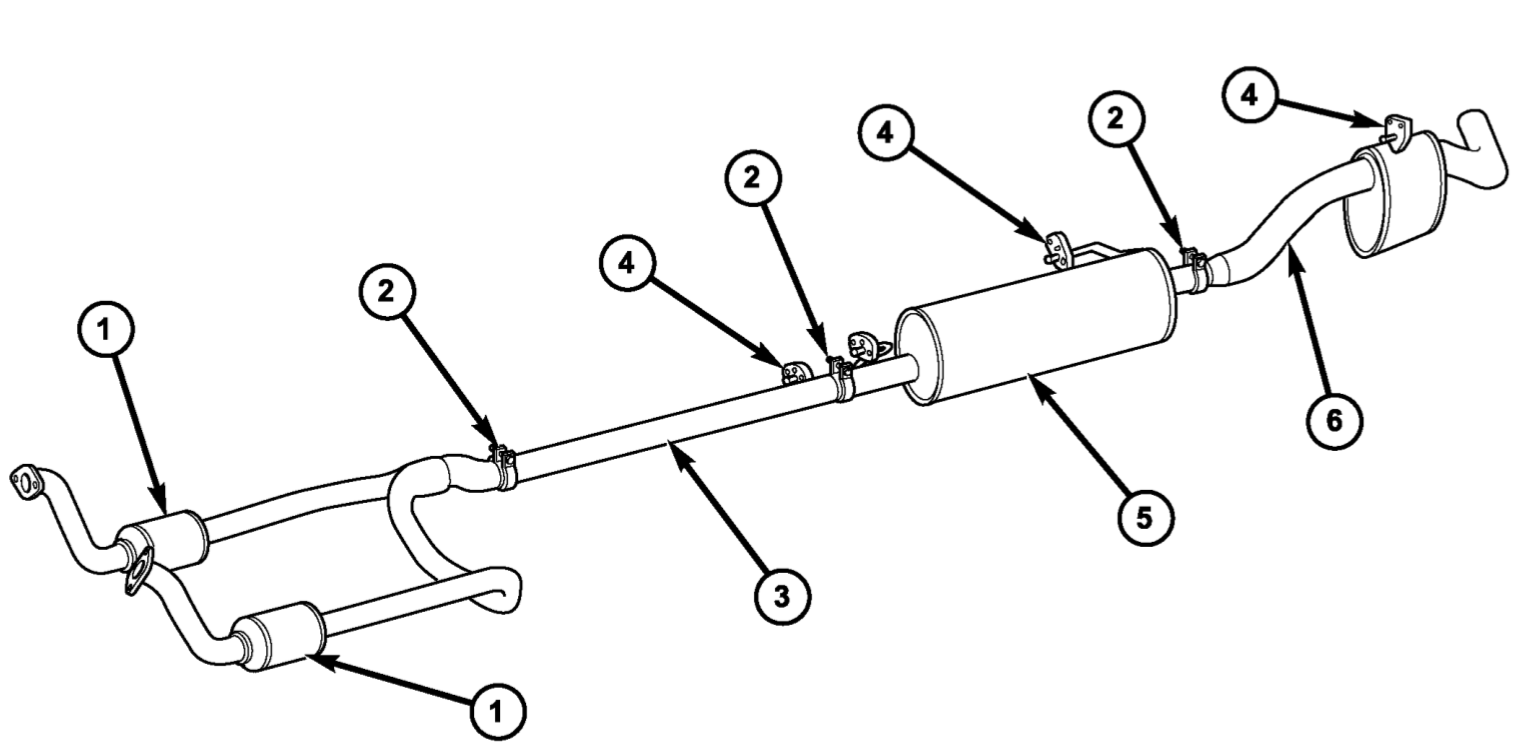
Exhaust System Removal and Installation
If you plan to remove the exhaust system with a blowtorch, do not set fire to nearby fuel lines. Use these instructions if you plan detach or take off any part of the exhaust system.
Catalytic Converter
A catalytic converter is a antipollution device on a dodge ram exhaust system that utilizes a catalyst for converting harmful pollutant gasses into less dangerous ones. The catalytic converters on the dodge ram are made of stainless steel and should last the life of the full-size pickup truck. The converters are termed crossover pipe or Y-pipe. Excessive heat will not cause a converter to fail but it can result in bulging or distortion. Catalytic converter malfunctions happen when unburned fuel enters it and lead to overheating. Replace the converter if it is heat-damaged and correct the issue that caused impairment. Carefully inspect other exhaust system components for heat damage.
Removal
- Raise and support the vehicle with jack stand(s).
- Use heat valve lubricant to saturate the bolts and nuts.
- Allow the lubricant to soak into the nuts and bolts for 5 minutes.
- Take off the clamps and nuts
- Take off the catalytic converter.
Installation
Note: The clamp that fastens the exhaust manifold and catalytic converter together should not be reused, replace it with a new part.
- Loosely place the converter and clamps into position.
- Install exhaust pipe onto exhaust manifold. Torque to 31 N·m (23 ft. lbs.).
- Torque all clamp nuts to 52.2 N·m (40 ft. lbs.).
- Lower the truck, turn on engine and check for exhaust leakage.
- Make certain the exhaust system has a minimum of 25.4 mm (1.0 in.) clearance between exhaust system and frame or body parts.
Exhaust Pipe
Removal
- Raise and support the truck with jack stands on a flat level surface.
- Use heat valve lubricant to saturate the bolts and nuts.
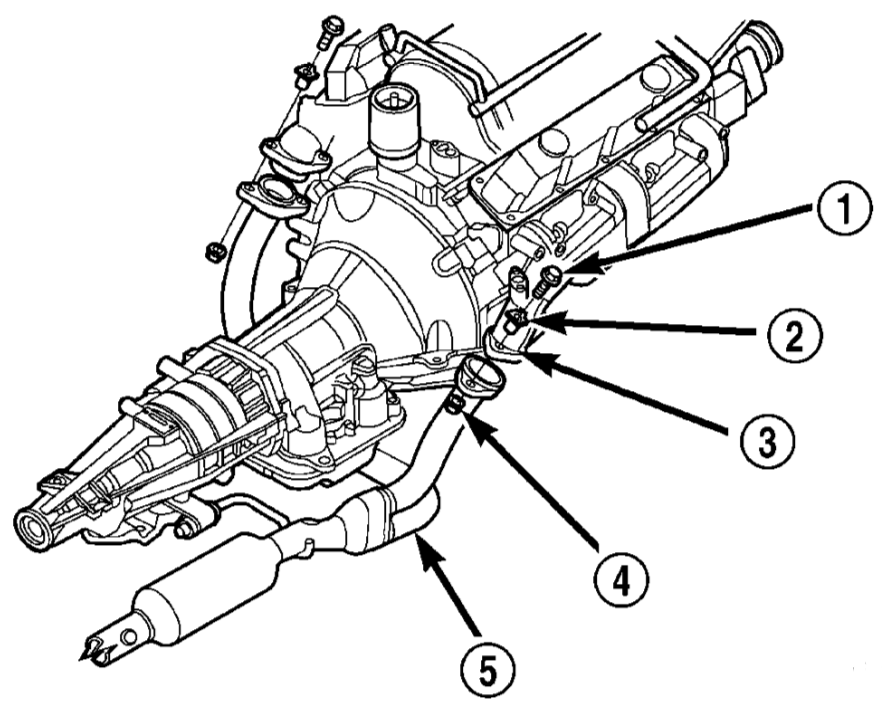
- Extract bolts (1), retainer (2) and nuts (4) that connect exhaust pipe (5) and exhaust manifold (3), then take off the clamp.
- Take off the exhaust pipe, refer to diagram.
Installation
- Fix the exhaust pipe into position.
- Ensure the exhaust pipe has adequate clearance between pipe and undercarriage components. A minimum allowable gap of 25.4 mm (1.0 in.) is required
- Connect exhaust pipe to exhaust manifold.
- Put the nuts, bolts and retainers into place. Tighten nuts to 31 N·m (23 ft. lbs.).
- Torque clap nuts to 54.2 N·m (40 ft. lbs.).
- Remove jack stands and lower vehicle.
- Fire up the engine and check for exhaust leakage.
- Make sure exhaust system is not making contact with frame.
Heat Shields
A heat shield is a steel or foil sheet used as an outer covering or coating for protection from excessive heat. The dodge ram utilizes both molded foil and stamped steel heat shields. The shields are attached underneath the vehicle in areas around the exhaust system. Never operate the vehicle without heat shields properly installed. The heat generated from the exhaust can or will cause damage to other components.
Removal
- Raise and support vehicle on flat level surface.
- Take off the nuts or bolts that attach the heat shield to the floor plan (Fig. 1) (Fig. 2) (Fig. 3), crossmember or bracket.
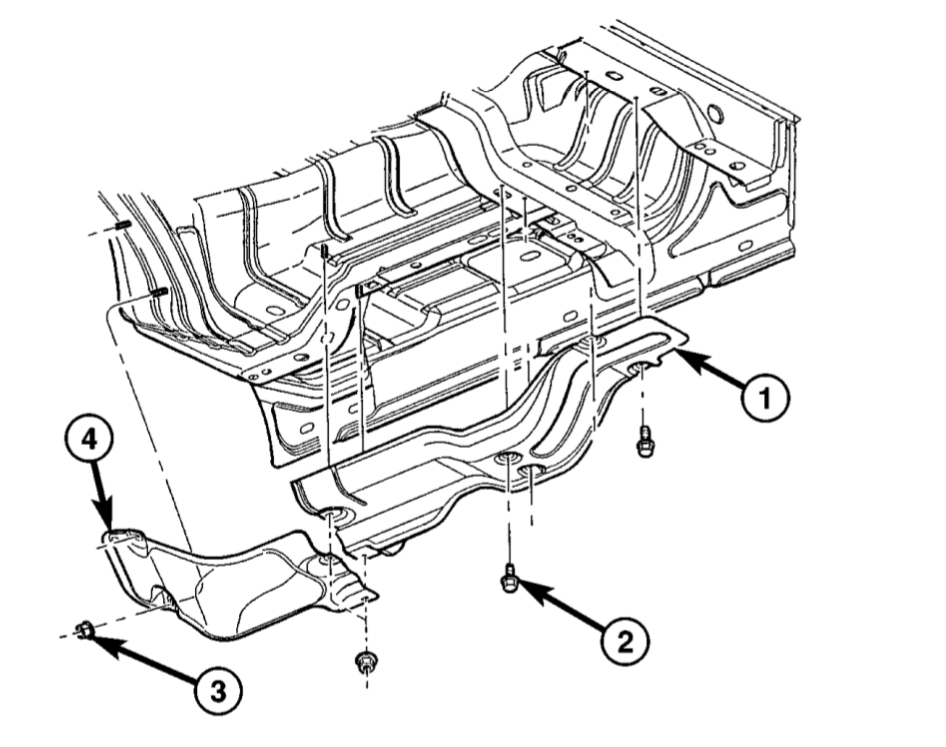
Fig. 1 Heat Shields – Right-Hand Side – Regular Cab: (1) Heat Shield. (2) Fastener. (3) Nut. (4) Heat Shield. 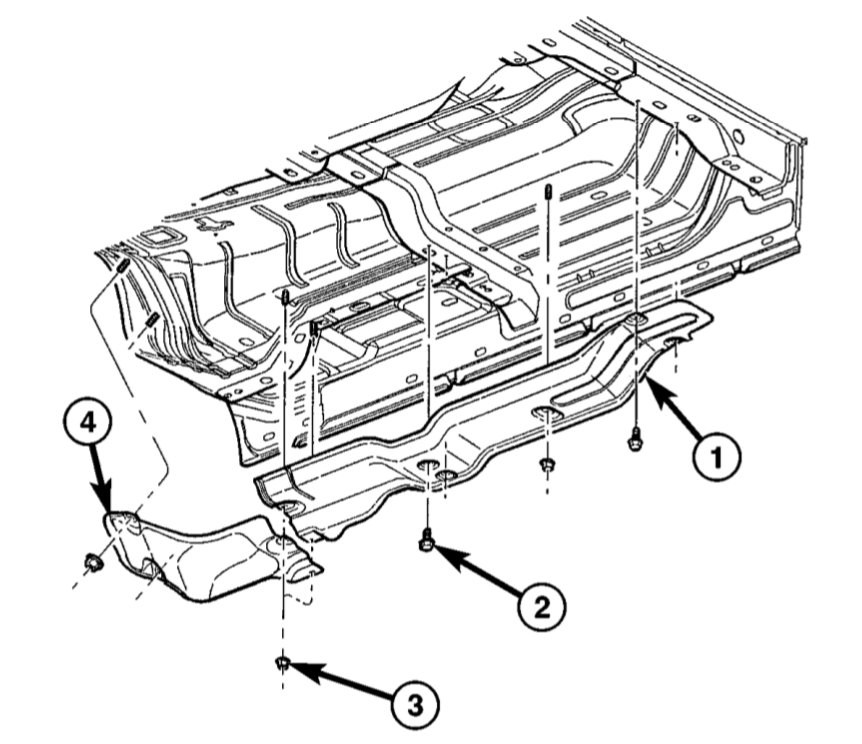
Fig. 2 Heat Shields – Right-Hand Side – Quad Cab: (1) Heat Shield. (2) Fastener. (3) Nut. (4) Heat Shield. 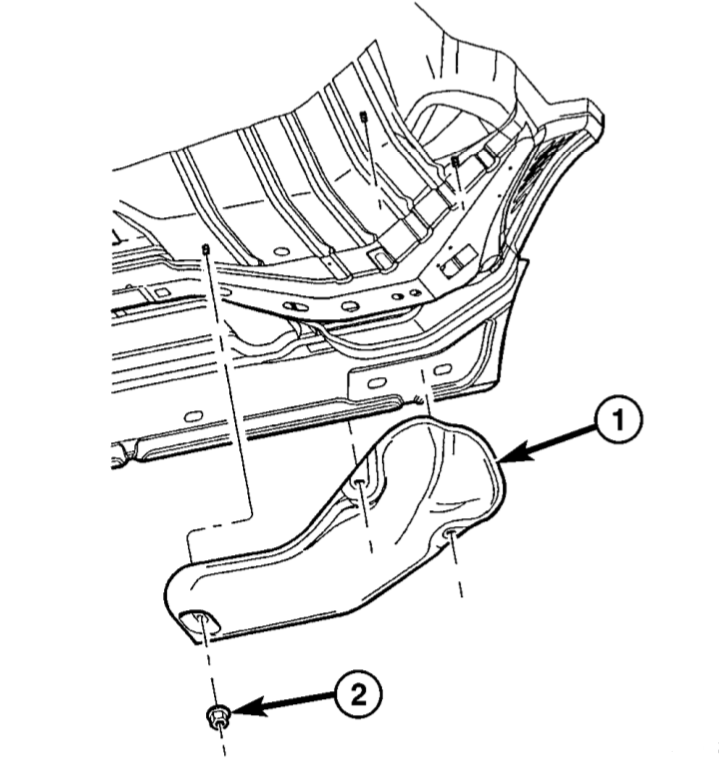
Fig. 3 Heat Shield Left-Hand: (1) Heat Shield. (2) Nut. - Slide the shield out around ……….
Muffler
A muffler is device fixed to the exhaust of motor vehicle to silence or reduce engine noise. A typical dodge ram muffler will last 40,000 to 80,000 miles depending on climate conditions i.e. coastlines or areas that get snow or salt.
Removal
- Raise and support the truck.
- Use heat valve lubricant to saturate the clamp nuts. Allow lubricant 5 minutes for penetration.
- Unhook muffler hangers, see illustration.
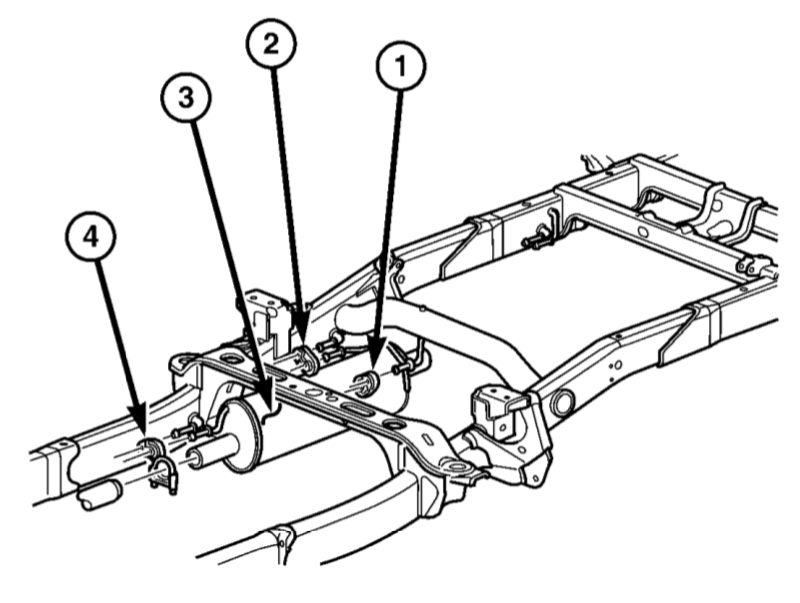
Muffler: (1) Insulator. (2) Insulator. (3) Muffler. (4) Insulator. - Take off clamps and nuts.
- Remove the muffler.
Installation
- Assemble exhaust system muffler and clamps loosely on the vehicle so as to allow for proper alignment before torquing the clamp nuts.
- Fasten the muffler to the insulator hangers, also termed muffler hanger or exhaust hanger. The insulators are made of rubber to absorb vibrations and dampen sound.
- Torque the clamp nuts to 54.2 N·m (40 ft. lbs.).
- Lower the vehicle.
- Start the engine and examine the exhaust system to ensure there are no leaks.
- Check exhaust system to make sure it is not making contact with frame or body panels. Emission regulations require a minimum clearance of 25.4 mm (1.0 in.) between body/frame and the exhaust system components.
Tailpipe
Remove
- Raise and support the pickup truck on a flat level surface.
- Use heat valve lubricant to soak the clamp nuts. Allow lubricant to penetrate the clamp nuts for 5 minutes. The lubricant will help loosen nuts covered in rust.
- Disengage the exhaust tail pipe support hanger from insulator, see illustration.
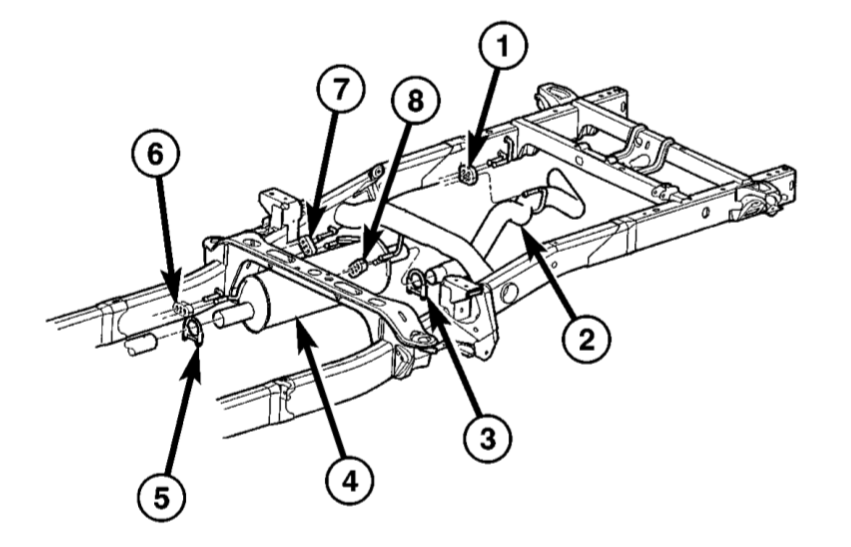
Tailpipe: (1) Insulator. (2) Tailpipe. (3) Clamp. (4) Muffler. (5) Clamp. (6) Insulator. (7) Insulator. (8) Insulator. - Remove clamps and nuts.
- Take off the tailpipe.
Inspection
Get rid of rusted clamps, worn out or damaged supports and connected parts. Use original equipment manufacturer OEM replacement parts or aftermarket parts that are equivalent so as to ensure proper alignment when fitted together.
Installation
- Assemble exhaust system muffler and clamps loosely on the truck so as to allow for proper alignment before tightening the clamp nuts.
- Connect the support hangers to the rubber insulators.
- Position the exhaust tail pipe on the vehicle and check for proper clearance.
- Torque all clamp nuts to 54.2 N·m (40 ft. lbs.).
- Lower the vehicle back to the ground.
- Turn on the motor and inspect the vehicle’s exhaust system for leakage.
- Make sure there is a minimum of 25.4 mm (1.0 in.) clearance between frame/body parts and exhaust system components. Make adjustments if needed.
Exhaust System Troubleshooting
| CONDITION | POSSIBLE CAUSE | CORRECTION | ||||||
|---|---|---|---|---|---|---|---|---|
| EXCESSIVE EXHAUST NOISE OR LEAKING EXHAUST GASES |
1. Exhaust leak at pipe joint. |
1. Torque clamp bolts to stop leak. Check for damaged joints. 2. Inspect muffler and replace if needed. Check exhaust for leaks. 3. Replace pipe. – 4. Tighten or replace flange, nuts or bolts. 5. Replace manifold. – 6. Tighten exhaust manifold bolts. Check for manifold flange warpage. – 7. Replace catalytic converter assembly. 8. Remove restriction, replace part if needed. |
||||||
| CAUTION: When performing repair work and replacing exhaust system parts, detach the connector(s) from the oxygen sensor. Do not allow the exhaust system to hang from the O2 sensor wires as it will cause damage to the harness and/or sensor. |
||||||||
